🔀 Version control with git.
Summary
This is a note for someone far from software development, but interested in tracking changes in source code and other text-based files. The logic is built around a specific, trivial example.
- backup: is protecting against data loss. So, when your computer dies, you are not too far behind. Any sort of regular backup procedure helps.
- (our focus) version control: is keeping track of changes in your files. So that you know what did you do, when, why, and can get back if needed. There are several tools, git is very popular.
- Think of it as a “protocol”, and a (local) app that runs it. GitHub is the most popular website offering hosting of git repositories. (There are alternatives.)
- Git is “distributed”: you work in a local copy. So, it is fast, and can work offline1.
- It is especially good to track any sort of plain-text files (source code, latex documents, markdown, etc.).
- It allows (and encourages) branching, when you keep several “lineages” of your code to test your ideas, while keeping a “clean” version easily available.
- This note contains a brief overview and discusses a simple example of individual (not collaborative) use.
- There are many resources online. E.g. “ProGit” is a good book.
- Working from a command line helps a lot to understand what’s going on, but:
- There are many excellent tools that help productivity –
Corrections, suggestions, and comments are very welcome.
Introduction
Some context
There are two adjacent problems: backups and version control.
- Backup basically means making “snapshots” for further recovery. I think the
key is to have regular procedure, which any suitable tools: built-in software
(e.g., “time machine” for Apple), borgbackup, or just
rsync, etc. - version control systems are used to keep track of changes in your files. Git is one of the most popular ones. Alternatives include subversion (SVN), mercurial, and more. Further we will focus on version control and, specifically, git.
(Collaboration on code and other plain-text files is another topic, which happens to be addressed particularly well by git – but this is out of the scope of this note.)
Tools for today
1) You would need to have git installed. Check from the command line:
git --version
which gave me:
git version 2.27.0
[ What if not? ]
If it did not work, start here. It works out of the box on my GNU/Linux
machine, but if I were to use other systems, I would look into GitForWindows
(see also a larger tutorial), or hoped that MacOS will suggest me to install
it automatically (or, e.g., try to brew install git, if not – see brew
for more details).
As pointed out in the docs, you would need to set your name and email (to be associated with your changes in the code).
$ git config --global user.name "Your Name"
$ git config --global user.email YourName@example.com
$ git config --global init.defaultBranch main # set the name of the default branch
2) We will need a text editor, of course. Any one will work. I am using (Space)Emacs with Magit on a daily basis, but it was more convenient to make a demo on VSCode (-ium) with a standard extension called GitGraph. Good editors have plugins that support git well and simplify many operations. For discussion here, I will show commands as issued from the command line, but I find editor integration more convenient to use for most tasks.
3) It is convenient to see what is happening in our repo on GitHub, so I used an account there for the example below. I tend to use Github pretty extensively to keep a copy of my code online2.
On Git vs. Github
Git is a version control system – think a “protocol”. You work with a local
app (git) that tracks changes in your local folder. Many providers offer
hosting compatible with git. Examples include GitHub, GitLab, BitBucket and
others. Self-hosted options are available (e.g., see gitea or GitLab).
Usually, third-party providers implement “social” tools as well: to facilitate collaborations, comments, issue tracking, etc. And also just allow to demonstrate what kind of code you write. I think GitHub is de facto standard at the moment.
The big picture
A project lives in a repository (“repo”). In fact, it is just a folder with a
special .git subfolder, where the magic happens. There is something called
“working area”, “staging area”, and repositories:

Key concepts with a running example
Basics: tracking changes
Assume we would like to develop some code in Python (this will be our running example). So, we create a folder and immediately initialize a repo:
git init
Output:
Initialized empty Git repository in /home/bochkarev/sandbox/demo-repo/.git/
It has created a special directory, .git, that will contain
the information concerning the history. Now, let us add some code and
save it as new_doc.py:
print("Hello world")

for i in range(5):
	print("i=" + str(i))
Assume we have implemented some basic functionality, and would like to save a snapshot of this state in the repo. Note that git “knows” that we have some changes now:
git status
Output:
On branch master

No commits yet

Untracked files:
  (use "git add <file>..." to include in what will be committed)
	new_doc.py

nothing added to commit but untracked files present (use "git add" to track)
So, as git suggests, we first add the changes to the “staging area”:
git add .
Here the period . means “all files in the current directory” (we could have
used a specific filename instead). Now git status shows that we have “changes
to be committed” (saved to the versions history):
git status
Output:
On branch master

No commits yet

Changes to be committed:
  (use "git rm --cached <file>..." to unstage)
	new file:   new_doc.py
We actually create a record in the versions history with:
git commit -m"first commit"
Output:
[master (root-commit) de41445] first commit
 1 file changed, 4 insertions(+)
 create mode 100644 new_doc.py
Let’s say, we continue the development, and add more code, so that new_doc.py now reads:
print("Hello world")

for i in range(5):
	for j in range(5):
		print("i=" + str(i)+", j=" + str(j))
Note that git is aware of specific changes. We can highlight them by saying:
git diff
Output:
diff --git a/new_doc.py b/new_doc.py
index fe46b97..105a3b3 100644
--- a/new_doc.py
+++ b/new_doc.py
@@ -1,4 +1,5 @@
 print("Hello world")

 for i in range(5):
-	print("i=" + str(i))
+    for j in range(5):
+        print("i=" + str(i)+", j=" + str(j))
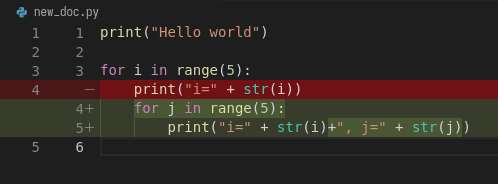
Indeed, we replaced the print line with a print in an inner loop: removed
lines are indicated with a minus sign in the beginning, added lines marked with
plus. Of course, it is not necessary to stare at cryptic symbols in the shell:
e.g., VSCode will highlight these changes nicely, if you switch to “Version
Control” tab and choose the changed file (new_doc.py):
If we are happy with the changes, again, we add them to the “staging” area and “commit” to the versions history with commands:
git add .
git commit -m"inner loop"
Output:
[master acd00af] inner loop
 1 file changed, 2 insertions(+), 1 deletion(-)
Now, to see the commits history, we can issue:
git log
Output:
commit acd00afdf4c0c0a3fa6f5229752f1807d4398688
Author: Alexey Bochkarev <a@bochkarev.io>
Date:   Fri Feb 5 13:15:56 2021 +0100

    inner loop

commit de41445c3b150488871ef8526b519488eda5ed26
Author: Alexey Bochkarev <a@bochkarev.io>
Date:   Fri Feb 5 13:05:17 2021 +0100

    first commit
Or, if we have a lot of these and want a quick overview, we might want them in a compact form:
git log --pretty=oneline --abbrev-commit
Output:
acd00af inner loop
de41445 first commit
Now, getting back to the commit first commit is as simple as git checkout de41445. The repo will come back to the state at that moment, so we can look
around. For example, we could save something and get back with git checkout master. Usually what I might want, however, is to fetch a specific file from a
specific commit into the current moment. I could do this with git show de41445:new_doc.py > old_version.py. (After this command I will have another
file, old_version.py, with the contents of new_doc.py as of the moment of
the first commit). I will not use this file, so I will just remove it for now,
with rm ./old_version.py.
Experimenting and working with code is more often done with something called branching.
Branching
So, one possible workflow is to have a “clean”, main branch (say, “ready to show to your supervisor”), and experiment in separate versions, merging back those that worked out.
Assume we want to try to switch to nice unicode variable names (greek letters). First, we create a new branch for this feature:
git checkout -b unicode_vars
Now, git status gives:
git status
And the bottom left corner of my VSCodium editor also hints of the current branch, like this:

Our previous state of the tracked files (one file in this case) was left in a
master branch, and we jumped into a separate code “spin-off”. Let me
rename a variable, so new_doc.py now would look like:
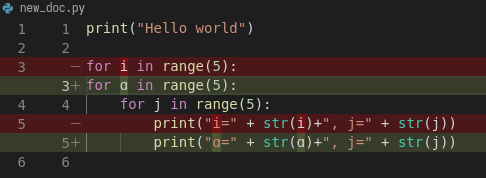
print("Hello world")

for ɑ in range(5):
    for j in range(5):
        print("ɑ=" + str(ɑ)+", j=" + str(j))
After we save the file, VSCode (or git diff) will highlight for us, what has
changed:
Again, we commit this change:
git add .
git commit -m"renamed variables"
Output:
[unicode_vars 985d560] renamed variables
 1 file changed, 2 insertions(+), 2 deletions(-)
Assume we want to make some unrelated change now. (Suddenly! Or maybe because we’ve got an email about this) E.g., remember that there is a more compact syntax for printing strings in Python. So we go back to the main branch to edit the file:
git checkout master
We are immediately back to the state we left when we made a spin-off, so we change the file to become:
print("Hello world")

for i in range(5):
    for j in range(5):
        print(f"i={i}, j={j}")
That’s way more readable, so we “save” it into the master branch:
git diff # let's see the changes
git add .
git commit -m"improved code readability (printing strings)"
Output:
diff --git a/new_doc.py b/new_doc.py
index 105a3b3..f288fa7 100644
--- a/new_doc.py
+++ b/new_doc.py
@@ -2,4 +2,5 @@ print("Hello world")

 for i in range(5):
     for j in range(5):
-        print("i=" + str(i)+", j=" + str(j))
+        print(f"i={i}, j={j}")
+
[master a6c0cc2] improved code readability (printing strings)
 1 file changed, 2 insertions(+), 1 deletion(-)
Okay, now we go back to work on our feature with git checkout unicode_vars.
Assume we test the feature with python ./new_doc.py, make sure it works, so we
want to integrate it back into the “main” branch of our code. To do this, we go
back to the master branch and try to merge it with the feature branch
(unicode_vars):
git checkout master
git merge unicode_vars
Output:
Auto-merging new_doc.py
CONFLICT (content): Merge conflict in new_doc.py
Automatic merge failed; fix conflicts and then commit the result.
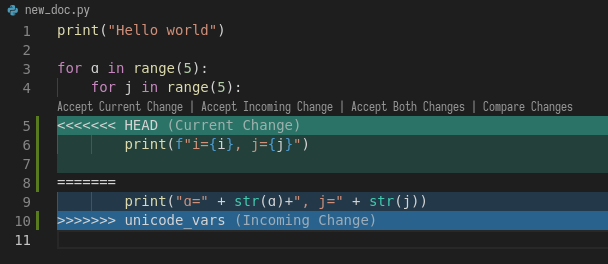
We have created a conflict: edited the same line in both branches, and there is no way to resolve it automatically. This is a normal situation, and the source file now looks as follows:
print("Hello world")

for ɑ in range(5):
    for j in range(5):
<<<<<<< HEAD
        print(f"i={i}, j={j}")

=======
        print("ɑ=" + str(ɑ)+", j=" + str(j))
>>>>>>> unicode_vars
This is pretty self-explanatory, but notice what has just happened. A change in
the highlighted line was straightforward to make, so git did it for us
automatically. Since print instruction was edited in both branches, we’d
need to edit it manually (with any editor) to our taste. Note that VSCodium
allows convenience of “Accept Change”-like buttons (which we wouldn’t use in
this case, though):
After the edits, the resulting file is:
print("Hello world")

for ɑ in range(5):
    for j in range(5):
        print("ɑ={ɑ}, j={j}")
Following the instructions, we add and commit the changes initiated by merge
as usual:
git add .
git commit -m"merged 'unicode variables' feature"
Output:
[master 1c7dd06] merged 'unicode variables' feature
So, again, what we have just done: we created a spin-off branch, tried to implement a feature, introduced some changes into the “main” code along the way, and merged everything back successfully. Many tools, including VSCode, can show nice figures to illustrate what is going on:

Each point here is a commit (a “snapshot” of the state for tracked files). We
created a separate branch, then our branches diverged due to the two conflicting
commits, and then we merged everything back at the very top commit, 1c7dd06a.
An alternative solution would be to try to “replay” the changes from
unicode_vars branch on top of the changes in master, as if it were based
on already updated master – see git rebase for details.
You can check what branches are there with:
git branch
Output:
* master
  unicode_vars
To show just branches not merged into the main branch: git branch --no-merged master. Branches that are no longer needed can be deleted with
git branch -d <branch-name>.
There are some materials on branching strategies and git workflows (e.g., on “git-flow” and GitHub flow, with the latter being focused on simple collaboration) – but this discussion looked somewhat too complicated for my own needs at the moment.
Dealing with a remote repo
Even if you work alone on your code, you might still want to use a concept of remote repos. For example, if you are running separate experiments on the cluster and would like to (1) keep them under version control, and (2) run them in parallel. But let us consider another (perhaps, more general) common use case, when you would like to sync your local repo with a remote version on Github – e.g., to keep things backed up online, or to share code.
Creating a remote GitHub repo is simple. Assume we have a local repository
first (the one we discussed above would work). We go ahead and create a
Github repo (not initializing it with anything). Essentially, Github will
give you both the address and commands to use to connect your local repo with
its remote counterpart. Afterwards, a remote will act mostly as another
branch(es). You could pull changes to your local repo from the remote,
push your local changes back to the remote, and so on. For example:
git remote add origin <Github-address>will make git aware of the specific remote repo, and will call this remote repoorigin.- alternatively, for an existing remote repo, which you would like to have in
your local folder, you issue
git clone <repo-address>. git push -u origin masterwill push your local changes frommasterbranch toorigin(on a Github server).git pullwill try to pull changes from the remote (assigned by the previouspush -ucommand) andmergeit into the current branch.3
A repository on the Github can be marked as “public”, so that anyone would be
able to see the code (see a note on visibility). For example,
source code for this website is available at
https://github.com/alex-bochkarev/bochkarev.io. You can create README file,
so it will be shown by default when someone opens your repository (and it is a
good practice to create one, describing what is this repo about, how to
contribute, etc. – at least very briefly. See About READMEs). Perhaps, the
most widespread format is .md in (Github’s) Markdown, but there is more.
Some tips, tricks, and notes
Adding changes
Interestingly, you can not only add changed files to a commit, but pick specific changes within a file – if you happened to make two logically different edits and would like to keep them in different commits. For example, in VSCode you can pick (“stage”) specific changes in the main editor window by pressing this “plus” sign:

If you happened to git add something wrong, you can always git reset. It
will not not alter any files, but remove everything from the
“stage area”, so you can start staging again.
Tags
Sometimes I want to mark certain commit with a meaningful comment – to be
able to get back to this version quickly, if needed. See git tags: git tag -m"Submitted to the journal" v1.0 followed by git push --tags will create a
tag v1.0 with a comment Submitted to the journal and push it to a remote.
Now, you can, e.g.:
- quickly get back to this version with
git checkout v1.0. - click “Tags” button on Github, choose
v1.0and download a.zipfile with this version.
Exploring the past
Sometimes it is handy to browse through past versions of the code. Apart from
the git log and git checkout mentioned above, the Github interface might
help. Note that you can click on any commit there and browse the repo (in a
web browser) as it was back then.
An overview for changes in a specific file with contributors can be called
with “History” or “Blame” buttons (see also git-blame docs). Note that Github
web interface shows master / main branch by default, but you can choose
any branch/tag/commit to explore. It helps sometimes to answer questions like
“where have this figure come from? Which version of my code?..”.
Sometimes it is also handy to have the current commit and branch (automatically – e.g., to include into a log file). The following commands might help:
git rev-parse --abbrev-ref HEAD # current branch
git rev-parse HEAD # current commit
Output:
master
1c7dd06adb46c63e2706babd2500c040e934d80e
Ignoring files
Sometimes you want to issue a simple git add . command, but do not want
some files to be tracked at all. Maybe some backup files, the ones related to
personal configurations that have nothing to do with the “public” repo, large
problem instances, intermediary results, auxiliary things (__pycache__ for
python projects, etc.). To do this, just add a special .gitignore file with
file names (can include wildcards). See also ProGit, GitHub docs, and
some examples.
Large files
As a special case, there is a problem of large files. GitHub imposes a strict limit on file sizes of 100 Mb per file (as of writing this). I do not know a good solution to this problem, but:
- The key point: It is questionable if 100 Mb+ files and/or binary files
really need text-based version control. See
.gitignoreabove. - There is something called git LFS (Large file storage.) I tried to use it once: seemed convenient, but I had a feeling that I am out of control regarding my current quotas, etc. So I decided for myself to avoid it whenever possible.
- See also GitHub docs on large files.
- It seems like there is an attempt to solve this problem specifically for ML projects called Data Version Control (DVC). See also Dolt and their blogpost on “GitHub for data”. These caught my eye, but I have no first-hand experience.
- Please, let me know if you are aware of any good solution, especially relevant to OR / DataScience.
Jupyter notebooks
I do not use .ipynb actively at the moment, so I can’t give any good
recommendations. First, I do not know any good solution to version-control
Jupyter notebooks. Git is still useful, since .ipynb are basically text files,
just does not allow to see differences conveniently. (A note on this.)
Note that Github is not always best even with showing (rendering) the notebooks. It might help to use a separate solution to link your notebooks hosted on Gihtub – e.g., see https://nbviewer.jupyter.org/. Google Colab also offers loading public notebooks from Github (as I write this). If you specifically need executing notebooks online, you might be better off looking into Google Colab or binder.
Submodules
If you ever find yourself in need of a “repo-in-a-repo” (e.g., when you use a library that you’d like to version-control separately) – see submodules.
Github Pages
Github offers a simple website hosting integrated with git – for projects and/or personal webpages. See GithubPages for up to date details.
Collaboration and Github
This is basically outside of this note’s scope, but of course, possible collaborations and social interactions are strong points of Github.
- You can “fork” a repository easily (to work locally and, perhaps, propose contributions back); a simple Hello World tutorial might help.
- There is an issue-tracking mechanism and per-project Wiki.
- and so on. Again, there is a large, separate topic.
Further reading
- ProGit book.
- Github Guides.
- Many other resources to choose from. Some random examples:
- some interactive tutorials: https://try.github.io/
- A visual git reference.
- A git primer.
- r/git community on Reddit (see the “sidebar”!)
- An extensive built-in help. E.g., see
git help everyday,git help gittutorial,git help git, and others.
-
Note that you do not need a Github account to work with git. I have several repos completely offline – just to track versions locally. You do not loose anything this way, except collaboration features and an off-site backup. ↩︎
-
Note that you can make a repo “private”, so no one by default will have access, besides you. (see the docs) ↩︎
-
Note that you can edit files directly on Github, via a web interface. It will just create commits on the respective branch of the remote repo. ↩︎